openindexmaps-workshop
Exercise 1: Create a polygon index map from an existing shapefile
Sometimes data publishers already have index maps for sets of tiled data, like elevation or LiDAR tiles. These indexes are often in the form of shapefiles. In this example, we’ll convert a shapefile index of elevation tiles for Erie County, New York, already downloaded from ftp://ftp.gis.ny.gov/elevation/DEM/
If you have not already downloaded the data for this workshop, do so now:
Be sure to extract the contents of the .zip file to your computer.
1. Add the data to QGIS
- Start a new project in QGIS (Project menu > New)
- Add the /exercise1/County_Erie2008_DEM_Index.shp by dragging it onto QGIS
Let’s verify that the data is in the correct location by adding a basemap, and set our map to use the CRS of the basemap.
- Web > QuickMapServices > Google > Google Road
- Right-click the “OSM Standard” layer name > Set CRS > Set Project CRS from Layer
2. Add some style
To improve the visibility of both the index map and the basemap, let’s change the style of the index map:
- Open the Layer Styling panel

- Select the “County_Erie2008_DEM_Index” layer
- Click “Simple fill”
- Set the “Fill color” to purple with about 50% opacity (another option would be to set the “Fill style” to “No Brush”)
- Set the “Stroke color” to dark purple
3. Explore the data
Let’s explore the values in the table, to get an idea of how we might want to convert the fields into OpenIndexMaps properties.
- Right-click the “County_Erie2008_DEM_Index” layer > Open Attribute Table
Notice the values found in the different fields:
FILENAME : uniquely identifies each tile
SIZE : size in bytes
COLLECTION : always the same
YEAR : always the same
PARTIAL : indicates tiles with incomplete coverage
DEM_COLLEC : always the same
TILE_DATE : always the same
NOTES : empty
DIRECT_DL : download url
Shape_Leng : irrelevant
Shape_Area : irrelevant
For the purposes of an index map, we can probably leave out any columns where every value is the same. (It would probably make more sense to add that information as metadata for the index map as a whole – see the end of this exercise.)
QGIS has a processing tool called “Refactor fields” that will let us rename, delete, and manipulate the values of these fields
4. Refactor Fields
In the processing toolbox, search for “refactor fields” and open the tool. The settings below will output a copy of the index map with just four fields: title, label, note, and downloadUrl. In this case, we are putting the size into a note so that it will display in the GBL interface.
Be sure to set all the types to string! The length and precision values don’t matter for strings.
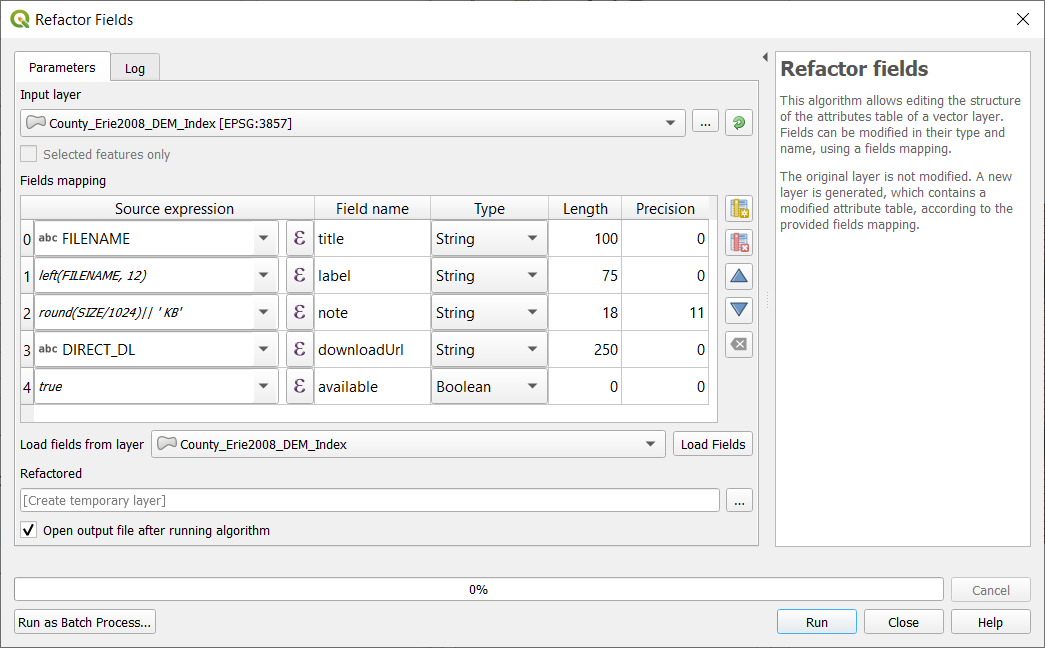
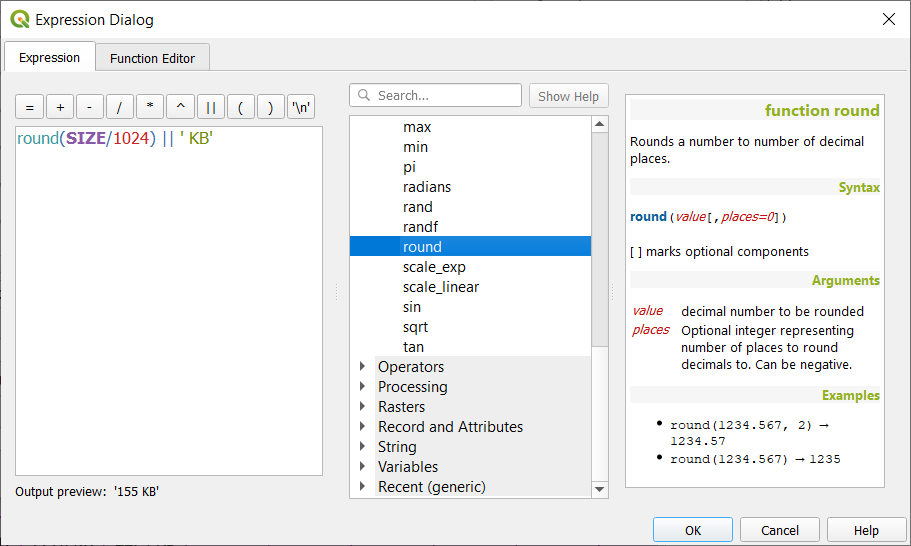
The source expressions can be typed in directly, but if you click on the epsilon (ε), QGIS will open an expression editor that provides a full list of available functions, along with syntax highlighting, error checking, and a preview of the output based on the first record.
Pay close attention to quotes in expressions. Double quotes (sometimes optional) indicate a field name, whereas single quotes indicate a literal text string.
Leave the default setting “Create temporary layer”, which will let you see the output without cluttering up your drive with files.
Click “Run” and leave the “Refactor fields” dialog open in case you need to make any corrections and run it again. (You can also get back to via the Processing menu > History)
You should have a new layer called “Refactored” on your map. Use the identify tool or look at the attribute table to make sure the results look right. If you need to make any corrections, remove the “Refactored” layer, then go back to the “Parameters” tab of the dialog, make your changes and run it again.
5. Save as GeoJSON
Once we’re satisfied with the output, we are ready to save it as a GeoJSON file.
- Right-click the “Refactored” layer > Make Permanent…
- Set Format = GeoJSON
- Always click the
...button to specify where you want the file saved! - Under Layer Options, set RFC7946 = YES (this will force it into WGS84, and set decimal precision at 7 digits)
Now you should have an index map saved as a GeoJSON file! If you open it in a text editor, you’ll see that it starts something like this:
{
"type": "FeatureCollection",
"name": "erie-2008-dem-index",
"features": [
You could also copy or drag the GeoJSON into geojsonlint.com, which will check for any parsing errors and also render the GeoJSON in a map.
Notice that only metadata is the “name”, which we be whatever you named the file. It would be a good idea to provide a bit more information, which could be added manually. At this time, there are no standard properties for the index map as a whole, but that is something that OpenIndexMaps may develop in the future. Here is an example of what we do for CUGIR:
{
"type": "FeatureCollection",
"name": "cugir-009099-index",
"title": "Index of 2-meter DEM, Tompkins County NY, 2008",
"websiteUrl": "https://cugir.library.cornell.edu/catalog/cugir-009099",
A word of warning
Due to over-enthusastic date-detection in GDAL (the format translator software that QGIS uses under the hood), if you try to edit an existing GeoJSON file that has date strings, they might get silently mangled into a different date string format.
Just last month, GDAL 3.0.3 added a DATE_AS_STRING open option that can be set to YES to disable autodetection of date/time/datetime, and I’m hoping that QGIS will start using that to improve the editing of existing GeoJSON files.
In the meantime, if you plan on making further edits to your index map, I would suggest first saving it to another format such as geopackage, edit that, then generate geojson from there.
Next: Exercise 2